Introduction
As Seamus has already said, there have been several packages that started life as an answer on TeX-SX. A while back, a few of us had the idea to make this a little more official, partly as a community exercise and partly to provide a little more impetus to get some answers into packages. After all, it’s one thing to provide an answer here but quite another to think of all the different ways it might be used, make ones code robust, and test it to extremes. So we collected together some suggestions and since then various people have been working on polishing these answers in to packages.
I’ve recently uploaded the first one of these to CTAN. It is the Braids package and is a TikZ/PGF package for drawing braid diagrams. The original question was How make efficiently nice braids diagrams.

Braids
A braid is one of a family of mathematical objects that model what happens if you take a bunch of strings and let a four-year-old play with them. The main characteristic of a braid is that it has a “flow”. The strings must have a direction and not double back. In addition, the starting points and ending points must match up; not strand-by-strand, but as a whole.
With these constraints, the places where the strands cross over can be separated vertically (with respect to the direction of the flow) so that each crossing is separate from the others. Then a strand can only cross over the preceeding or succeeding strand. By listing these crossings in the vertical order, we get a combinatorial description of a braid.
The collection of all these descriptions (for a fixed number of strands) is known as the braid group. It is a group because we can place one braid after another and tie the bottoms of one set of strands to the tops of the other. Also, we can undo a crossing by crossing back again.
This combinatorial description is a very useful one and is often used to specify a braid. It is very easy to recover the braid from its description.
Usage
The basic usage of this package is to specify the element in the braid group. As it is a TikZ package, the way of telling TeX that this is a braid is deliberately TikZ-like. Thus:
\braid a_1 a_2;
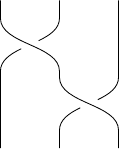
The choice of a is arbitrary, it can be anything.
Here, the subscripts refer to which strands are involved in the crossing. The strands involved in the crossing a_k are the kth and (k+1)th, and the kth strand goes over the (k+1)th.
For reverse crossings (that is, the (k+1)th going over the kth), add the superscript {-1}. The reason for the notation is clear from the following braid:
\braid a_1 a_1^{-1};

The a_1^{-1} crossing “undoes” the a_1 crossing. Even the most frustrated of parents will agree that:
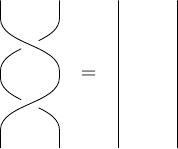
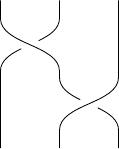
It is also possible to specify the superscript 1 (or {1}) for an ordinary crossing. The indexing subscript and crossing superscript can be specified either way around.
\braid a^{1}_1 a_2^{-1};
Advanced Usage
If crossings don’t involve the same strands, they can be placed either way around, or even appear at the same level. To specify this, join the crossing elements with a hyphen. Thus:
\braid a_1-a_3;

No error checking is done. It is possible to write \braid a_1-a_2;, and it will produce a diagram, though not a braid diagram.
Floors
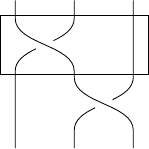
A floor is a rectangle drawn behind a crossing, spanning the width of the braid. To draw a floor, put a vertical line before the crossing.
\braid | a_1 a_2;
Styling
Everything can be styled. Absolutely everything.
Styling options are passed as an optional argument to the \braid command (much as to a \draw or \node command). Any “bare” styling options are applied to all the strands. Any transformations specified are applied to the whole braid.
It is possible to style individual strands using the syntax style strands={list}{style}, where list is a comma-delimited list of the strands to which the style should be applied.
Floors can also be styled, either using style all floors={style} to define a default and style floors={list}{style} to override it for a list of floors. The actual rendering of a floor can also be changed. The default is to draw a rectangle, but this can be set to almost anything via the key floor command. This should be a TikZ command which should do something, such as draw a rectangle. The coordinates of the corners of the floor are passed to this command as the macros \floorsx, \floorsy, \floorex, and \floorey (this is to avoid the usual hassle of figuring out how many times to escape the arguments).
The braid will grow in number of strands according to the crossings added, but it is possible to set a minimum number via the key number of strands. The size of the braid can be influenced by the keys height and width which specify how big a crossing will be. There is also a border height which adds a little extra at the start and end of each strand.
Anchors and Positioning
Because the braid grows dynamically as it is specified, it is easiest to position by locating the starting position of the first strand. So if the at key is given then, or if the phrase at (coordinate) is given at the start of the braid specification then the start of the first strand is placed at that coordinate.
If the braid is given a name, via the name or by specifying the name at the start of the braid specification, as in cci lang=”latex”, then various anchors are defined. In particular, the ends of the strands are labelled as name-number-end and name-rev-number-end where name is the given name, number is the number of the strand, and end is either s or e for the start or end. For the rev versions, the numbers are the order at the end of the braid.
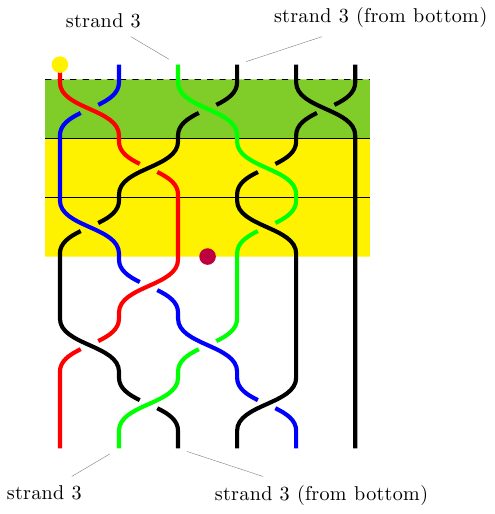
\begin{tikzpicture}
\braid[
 style all floors={fill=yellow},
 style floors={1}{dashed,fill=yellow!50!green},
 floor command={%
 \fill (\floorsx,\floorsy) rectangle (\floorex,\floorey);
 \draw (\floorsx,\floorsy) -- (\floorex,\floorsy);
 },
 line width=2pt,
 style strands={1}{red},
 style strands={2}{blue},
 style strands={3}{green}
] (braid) at (2,0) | s_1-s_3-s_5 | s_2^{-1}-s_4| s_1-s_4 s_2^{-1} s_1-s_3 s_2^{-1}-s_4^{-1};
\fill[yellow] (2,0) circle (4pt);
\fill[purple] (braid) circle (4pt);
\node[at=(braid-3-s),pin=north west:strand 3] {};
\node[at=(braid-3-e),pin=south west:strand 3] {};
\node[at=(braid-rev-3-s),pin=north east:strand 3 (from bottom)] {};
\node[at=(braid-rev-3-e),pin=south east:strand 3 (from bottom)] {};
\end{tikzpicture}
PS
As with all my posts so far on this blog, this post was written in LaTeX. Thanks to the external library for TikZ, even getting the pictures drawn and included was simplicity itself.
Images are broken.
“in to” != “into”
The images doesn’t seem to work, at least I’m not seeing any of them.
(That’s what you get for not updating the page for some minutes, before posting a comment.) On the other hand, the images show up just fine in Google Reader.
Thanks, both. I remember getting very confused about “up to” versus “upto” when writing my thesis. The links was a relative versus absolute reference issue. The preview showed them just fine, presumably because it has a different root than the final document.
Dear Andrew,
You are a genius! Thank you so much for this brilliant piece of work. I have been learning tikz/pgf so I could make braided figures. There is a solution based on xy-pic, but that’s … yuck, compared to tikz.
Your package is a godsend. Thanks again. I’ll be sure to cite your work in my papers 🙂
Cheers,
Deepak
Hi Andrew,
Two questions for you:
How do you draw a trivial braid? Let’s say I want a_1 and a third strand which is not braided with anything, or if I just want to draw n unbraided strands, how do I do that? If I use: \braid a_2, this gives me one trivial strand followed by two braided ones. If I want two braided strands followed by a trivial strand I can use something like \braid [rotate=180] a_2. This does the job but then I have to adjust everything to take into account the 180 deg rotation. For e.g. a_2 -> a_2^{-1}, etc. This will get quite complicated for braids with more than 3 strands.
What do I do if I want to use “decorated” strands? Sometimes we work with framed braids – i.e. strands with finite width. I can achieve this with the “line width” option in the \braid command. Such strands can have “twists” in them. In a braid diagram a clockwise/counter-clockwise twist is indicated by a circle with a plus/minus within it. I can add such decorations at the beginning or ends of strands using the \node [at=(braid-1-s)] or \node [at=(braid-1-e)]. What do I have to do to add such decorations in-between the various twists? Something along the lines of:
\braid a_1 [insert twist on 2^nd strand] a_2
Hopefully these are non-trivial questions 🙂
Actually, it would be nicest if these were trivial questions and I could just say “do this or that” (incidentally, the documentation on CTAN, or via texdoc braids, is more extensive than this blog post).
You can set a minimum number of strands using the “number of strands” key. So \braid[number of strands=3] a_1; will do for the first part of your question. At the moment, I think that every level has to have a crossing so drawing a trivial braid of a certain height is tricky. It sounds a good idea to add that in. How about 1 representing a “no crossing”?
For the second, then at the moment there’s no natural way to add these twists. It would be possible to hack them on top, but better to extend the package to allow them. Where are they normally added? Is it between the crossings? Do you have picture that you can link to or send me of an example? Is there a standard syntax for indicating these twists?
When drawing these thicker braids, do you find that the gap left in the under strand is a little thin? I considered making this configurable – it would be easy to do – would that be a useful addition?
Thanks for the quick reply, Andrew.
The “number of strands” options solves one problem! Not specifying any crossing gives me a trivial braid with n strands but too short in height. That can be fixed with the yscale option in the \braid command.
1 would indeed be good rep for “no crossing”.
As for the twists, take a look at the figures on page 3 of this paper http://arxiv.org/abs/hep-ph/0503213v2. In those figures the twists are at the top or the bottom of the braid, but in general, one could put them in between crossings. Of course, all such twists can always be moved up or down a strand until they are at the top or bottom of a braid, but it would be nice to be able to put them in the middle for illustrative purposes.
I used the following code for a thickened braid:
\begin{tikzpicture}
\braid [
number of strands=3,
line width=8pt,
style strands={1}{red},
style strands={2}{green},
style strands={3}{blue},
yscale=1
]
(braid_1) a_1;
%\node [at=(braid_1-1-s),circle,draw] {};
\end{tikzpicture}
The amount of the gap left in the under strand seems fine, but the alignment of the under and over strand at the crossing is not quite right unless I set yscale=2.
It would also be nice to be able to “stack” braid diagrams as in fig. 2 of the paper I mentioned above. (Braids are “multiplied” by stacking them end-to-end.) Though I suppose one could do that with standard tikz commands.
Okay, sounds like a
1for a no-crossing is something to implement. I’ll take a look at your sample code to see about the crossing placement as well.With the twists, I think that the best would be to put these on top of the strands after the braid itself has been rendered. From that diagram, it seems as though the twists are like badges pinned to the ribbon, so we first draw the ribbon and then place the twist notation on top. Any suggestions on the syntax? It would go between crossings, so something like a_2 twist_3 a_4 twist_2^{-1}, or perhaps a_2 +_3 a_4 -_2 since the symbols will be like \oplus and \ominus.
Regarding stacking, once one braid has been placed then you can use the anchors to place the next one. So \braid[…] at (oldbraid-…) will work – look in the documentation for the exact syntax (and ask if it’s not clear).
The identity was easy enough, that’ll be in the next update.
Regarding the thick strands, here I’m not sure what to do. The reason that it looks bad is because the strands are not crossing at right angles. So the chunk cut out of the under-strand does not really correspond to the over-strand. With thin braids, this isn’t noticeable. But with ribbons then it is. Putting
yscale=2(orheight=2cm) happens to be just about the right amount to make the crossings at right angles.The simplest fix for this is to ensure that the crossings are at right angles. I would make this an optional fix since for thin strands it isn’t needed and might look odd.
More complicated fixes would involve changing how the crossings were done. At the moment, they work simply by clipping out a piece from the under-path. This avoids having to draw the over strand on top of the under strand – which isn’t actually possible since the strands are drawn as whole paths.
With the twists, I’m thinking of a generic “label” command which would give the ability to put a label on a strand between crossings.
Updated version now at http://bazaar.launchpad.net/~tex-sx/tex-sx/development/files
New features: identity (via 1), configurable gap size (via gap key), and labels for strands (via \label[style]{strand}{label text}). See braids_test.tex for examples as the documentation isn’t up to date yet. Once I’ve tested these a bit, I’ll upload to CTAN.
Documentation now updated as well.
I’m trying to compile the braids_test.tex file. The label and identity fixes don’t seem to be working.
I have a suggestion regarding the syntax, which I probably should have mentioned earlier. In the literature the notation commonly used is of the form \sigma_{ij} (\sigma_{ij}^{-1}) for over (under) braiding between the i^th and j^th strands. Your syntax drops the second index. I would suggest to change the syntax, if possible, to be of this form.
About the twists – the label option sounds good. It would provide more flexibility, because, in general, twists can be of a fractional amount \pm \pi/3 and so on, rather than only \pm \pi. People could use whatever symbols they preferred to indicate a twist of the desired amount. Also take a look at the figures in this paper: http://arxiv.org/abs/quant-ph/0401090v4. In particular, Fig.3 (pg. 19). Braids form the language of “topological quantum computation”, with the strands representing individual qubits. One can perform operations on individual strands – which could be represented by appropriate labels on those strands.
I guess the final product will the end result of several stages of testing and tweaking, but in any case, your work so far will be useful for a wide class of researchers! So, once again, gracias muchos!
Hard to know what to say about the braids_test.tex file without knowing more details. Do you get anything at all? If you could send me the log file by email I might be able to figure out what’s going wrong.
With the second, I’ll need to see what the more general braid looks like where the ith and jth strands can be intertwined. I know that the braid group is generated by the i,i+1 braids so that’s what I implemented, but I don’t really work with braids so don’t know all of what is needed – which is why conversations with people like you are so useful! So can you include a link with a sample diagram? Thanks.
Your last comment is spot on! The point of releasing this “in the wild” was not that it is finished, just that I need more input to know how to proceed.
Whoops. I goofed up with that point about the braids syntax. Your syntax is just fine as it is. The braiding of the i^th and j^th strands can indeed be expressed in terms of the elementary generators!
I will e-mail you with further questions and comments. Cheers.
PS: If you’re interested in an extremely readable review of braids and all that in the context of physics you should check out John Baez’s page at http://math.ucr.edu/home/baez/braids.html.
Phew! I’m glad about not needing to do arbitrary crossings as working out where the strands would meet (and thus need clipping) would be quite complicated.
John Baez’s stuff is always worth linking to. With this package, I’m more interested in what sort of diagrams braidists like to draw than in the actual interpretation of braids.
nice work you have done here.
is it possible to draw braid that is presented in Birman-Ko-Lee presentation? like in Figure 4 of http://www.ims.nus.edu.sg/Programs/braids/files/david.pdf
I don’t think it can do that at present (been a while since I looked at the code), but it probably wouldn’t be hard to add these extra elements. Shall I consider that a feature request?
I am a beginner so I don’t know how to add those extra elements, so yes, a feature request, thanks!
Thanks for your packages, in particular braids. I found that the version in http://bazaar.launchpad.net/~tex-sx/tex-sx/development/files has more features than the one in CTAN. Have you plans to submit the new version to CTAN?
Hello. Any improvement on trivial braids? If I use only
1I got two vertical bars. OK.But I’d like to draw more vertical bars (for example,
a_1 1 1 1) or either to drawa_1and multiply it by the trivial, that is, to get longer braids going down.Regards.
Is there a way to draw welded braids?